How to Draw a Teddy Bear – Drawing Turorials and Coloring Tips
Do you remember the warm embrace of your favorite teddy bear from childhood? Now, imagine being able to draw and create your very own teddy bear masterpiece. Sounds intriguing, doesn’t it? In this step-by-step guide, we will explore the art of drawing a teddy bear, offering insightful tutorials and expert coloring tips to bring your creation to life. So, whether you’re an aspiring artist or simply looking for a fun activity, get ready to unleash your creativity and learn how to capture the cuddly charm of a teddy bear on paper!
Step 1 – Drawing the Head and Chin
In order to draw a teddy bear, we must first start with the head and chin. The head is the focal point of the bear, and its shape sets the foundation for the rest of the drawing. To create the head, use a long, curved line to form the top part of the head, resembling a rounded shape. This line should start from the top and gradually curve down towards the chin.
Next, draw a smaller curved line below the head to form the chin. This line should mirror the curve of the top part of the head and connect to it smoothly. Pay attention to the proportions and ensure the chin line is shorter than the head line, as teddy bears often have round, chubby faces.
By drawing these two lines, we have successfully created the basic outline of the teddy bear’s head. This step lays the foundation for the rest of the drawing process, as the head is a crucial element in capturing the essence of a teddy bear.
Take a look at the visual reference below to get a better understanding of how to draw the head and chin:
Drawing the Head and Chin – Step 1
| Materials Needed | Instructions |
|---|---|
| Pencil | 1. Start by drawing a long, curved line for the top part of the head. |
| Eraser | 2. Draw a smaller curved line below the head to create the chin. |
| 3. Ensure the chin line is shorter than the head line. | |
| 4. Connect the chin line smoothly to the head line. |
Step 2 – Adding the Ears
Now that we have the basic outline of our teddy bear’s head, it’s time to add the adorable ears. The ears play a vital role in giving our teddy bear its signature look.
To start, draw two curved, rounded lines on top of the head. These lines will represent the ears. Keep the lines simple and basic for now, as we will add more details in later steps.
Take a look at the reference picture below to get a better idea:
 |
Notice how the ears are positioned on top of the head, slightly angled outward. This placement gives our teddy bear a friendly and approachable expression.
Remember, we want the ears to be proportional to the head and balanced with the rest of the features. Take your time and adjust the size and shape of the ears until you are satisfied with the overall look.
Once you’ve drawn the ears, we can move on to adding more details to bring our teddy bear to life. Stay tuned for the next step!
Step 3 – Drawing the Arms
Now it’s time to draw the arms of our teddy bear. The arms add personality to our teddy bear and make it more huggable. Let’s follow these steps to create adorable waving arms for our drawing.
-
Start from the line of the head.
-
Curve the arms up and around as shown in the reference picture.

By curving the arms, we give the teddy bear a friendly and inviting posture, as if it’s ready for a warm embrace. Take your time to shape the arms and adjust their size to match your drawing. Remember, this is your teddy bear, and you can add your personal touch to make it even more special.
Step 4 – Creating the Body and Other Arm
Now that we have drawn the head, chin, and ears of our teddy bear, it’s time to move on to the next step – creating the body and the other arm. This will bring our teddy bear drawing closer to completion!
To begin, use a curved line to draw the back of the teddy bear. Start from the waving arm and create a gentle curve downward. This will give our teddy bear a nice rounded body.
Next, draw a rounded line coming down from the right-hand side of the head. This line will represent the other arm of our teddy bear. Make sure it’s parallel to the waving arm, giving the teddy bear a symmetrical look.
Finally, draw another line underneath the arm to form the belly of the teddy bear. This line should be curved and connect the body and the arm together.
Take a look at the reference image to get a better understanding of the positioning and proportions. Remember, practice makes perfect, so don’t worry if it doesn’t look exactly right on your first try. Keep refining your lines and shapes until you’re satisfied with the overall body structure of the teddy bear.

Now that we’ve completed the body and the other arm of our teddy bear, let’s move on to the next step – drawing the legs!
Step 5 – Drawing the Legs
To complete our adorable teddy bear drawing, we need to give it some cute and rounded legs. These legs will give our bear a sitting position, adding to its overall charm. Let’s get started!

Follow these steps to draw the legs:
- Start by drawing two short, rounded lines coming out from the bottom of the bear’s body. These lines will form the upper part of the legs.
- Continue the lines downward, making them slightly longer to create the lower part of the legs.
- Finally, connect the ends of the lines with a curved line to complete the outline of the legs.
Remember to keep the legs short and horizontal, indicating that the teddy bear is sitting down. This will add a cute and cuddly touch to your drawing.
Once you have drawn the legs, you can proceed to the next step to add more details to your teddy bear.
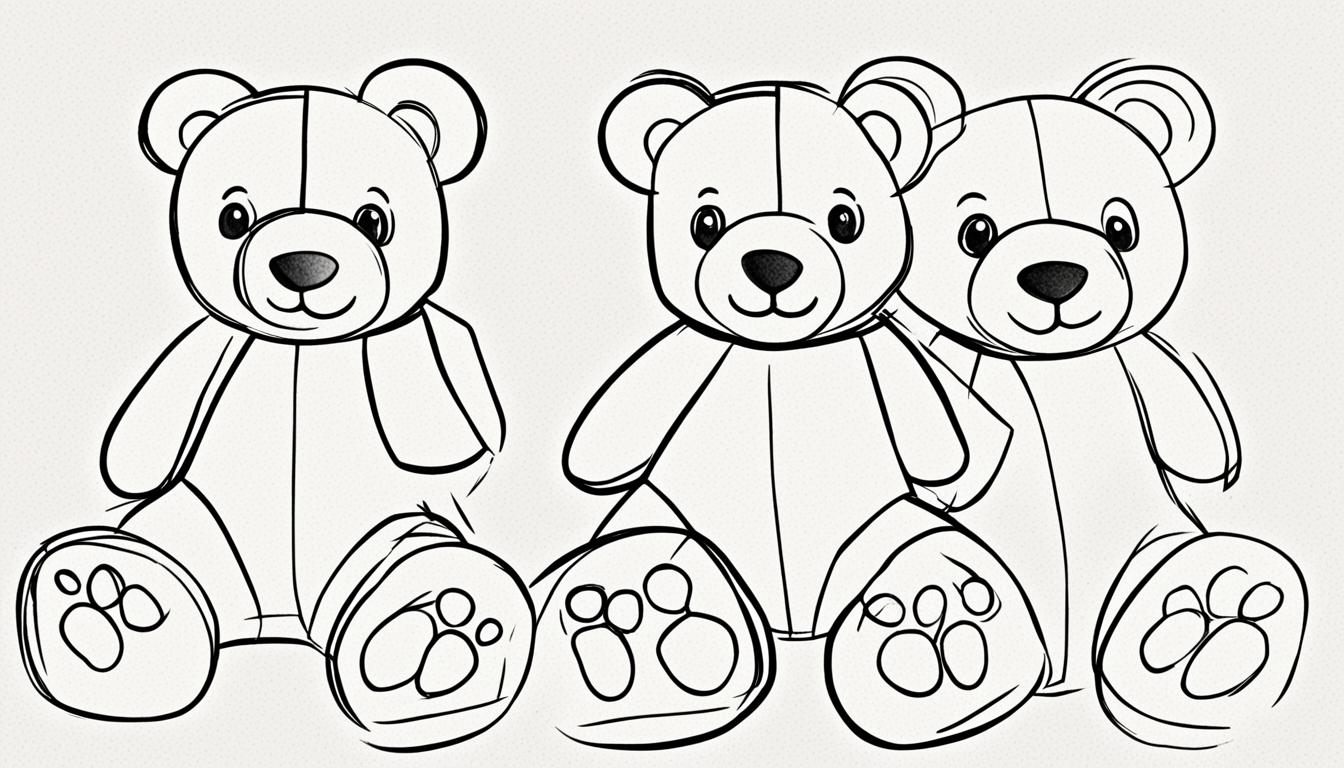
Step 6 – Adding Pads on the Limbs
Now it’s time to add some adorable details to our teddy bear! Let’s draw cute pads on the ends of its limbs, giving it an even more cuddly look. Follow these simple steps:
-
For the arms, draw small circles at the ends, representing the pads.
-
On the bottom of the feet, draw oval shapes to create the pads that allow the teddy bear to walk around with ease.
By adding these pads, we bring depth and realism to our teddy bear drawing, making it even more irresistible! Take a look at the image below for a visual guide:

| Materials | Steps |
|---|---|
| Pencil | 1. Draw small circles at the ends of the arms for the pads. 2. Draw oval shapes on the bottom of the feet for the pads. |
| Paper | – |
| Eraser | – |
Once you’ve added these cute details, our teddy bear is on its way to becoming a masterpiece. The next step will bring even more life to its fabric-like appearance. Keep going!
Step 7 – Adding Crease Details
To give our teddy bear more texture and dimension, we can add some simple line details to create fabric creases. By adding these crease details, we enhance the realism of our drawing and make our teddy bear come to life.
Start by adding two small lines near the leg of the teddy bear, as shown in the reference picture below:

These lines represent the fabric creases on the teddy bear’s leg, giving it a more realistic and tactile appearance. If you’re feeling creative, feel free to add more lines in other areas of the teddy bear to add more depth and detail.
Remember, the key here is to keep the lines simple and subtle, as teddy bears often have soft and plush fabrics. These crease details will add a touch of authenticity to your drawing and make it even more enjoyable to look at.
Teddy Bear Crease Details
| Benefits of Adding Crease Details | Steps to Add Crease Details |
|---|---|
|
|
“The crease details make the teddy bear look more cuddly and lifelike. They add a sense of softness to the overall drawing and bring out the plushness of the fabric.” – Teddy Bear Drawing Enthusiast
Step 8 – Drawing the Face and Final Details
Now it’s time to bring our teddy bear to life by drawing its adorable face. Follow these simple steps to create a face full of charm and character:
- Start by drawing two small circles for the eyes. These will be the windows to our teddy bear’s soul.
- Next, add a small oval for the nose, right below the eyes. This will give the teddy bear a cute button-like nose.
- Now, draw a smiling mouth using curved lines. Let the smile be warm and inviting, reflecting the teddy bear’s friendly nature.
With the face complete, let’s move on to adding some final details to enhance the overall drawing:
- First, add some lines on the head and ears of the teddy bear. These lines will bring out the fabric creases and add depth to our drawing.
- Feel free to get creative and add any other final touches that you think will make your teddy bear unique.
Remember, the final details are what will give your drawing that extra charm and personality. Take your time and enjoy the process!

Get Inspired
“Drawing the face of a teddy bear is like giving it a soul. It’s the moment where innocence and cuteness shine through.” – @ArtisticExpressions
Your Teddy Bear is Almost Complete!
With the face drawn and the final details added, your teddy bear drawing is almost complete. The next step is to bring it to life with colors! In the next section, we will explore various coloring techniques to make your teddy bear truly unique and special.
Conclusion
Congratulations on successfully learning how to draw a teddy bear in 9 simple steps! With a little practice and creativity, you can bring your teddy bear to life by exploring different coloring techniques. Remember, the joy of drawing comes from letting your imagination run wild and infusing your personal touch into your artwork.
Keep honing your artistic skills by experimenting with various drawing techniques. Whether it’s shading, cross-hatching, or blending, each new approach will add depth and dimension to your teddy bear drawings. Embrace the process of learning and have fun along the way!
By regularly engaging in drawing exercises, you will not only improve your ability to draw teddy bears but also develop a broader understanding of art. Artistic skills are versatile and can be applied to various projects and creative endeavors. So keep exploring and challenging yourself to unlock your full artistic potential.


